|

One of the most frequently asked questions in newsgroups and by my readers is, “Will Movie Maker be upgraded to support DVD burning soon?” Third-party solutions for Microsoft Windows XP have long been available that provided this capability, and I wrote about one of them in Burn a Movie Maker Project to DVD. Until now, however, there hasn’t been a built-in solution that offered a unified experience for everyone. To satisfy that customer demand, Windows Vista Home Premium and Ultimate include Windows DVD Maker, a companion feature to Windows Movie Maker that offers a rich set of functionality set that is well-balanced between power and ease-of-use.
As a technology enthusiast, watching technology advance is especially exciting when that advance results in new capabilities for all of us that were previously available only to a select few. Perhaps only communications advancements through cellular technology have had a greater impact on our daily lives than the introduction of digital media, which makes music and video both readily available and easily manipulated. So easy, in fact, that entirely new opportunities exist today that were unimaginable only a short time ago.
For example, having been married 11 years ago, at a time when wedding videos were almost exclusively professionally made in studios with specialized equipment, I became curious what it would be like for a newly married couple today. Would it be possible, for example, for a couple to make their own wedding video, using nothing but a standard, off-the-shelf computer and Windows Vista? And just as important, would the experience be pleasant or frustrating, and would the end product be good? I still had all the original source material from my wedding, so I set about finding out.
The first step in creating a DVD is acquiring all the content. You need still photos, music, and of course, video. For the most part, all these elements are available digitally today, which makes it easy to import into your computer and your project. In my case, the photos and video were analog — more specifically, prints/negatives and VHS tapes. As a result, I had an extra step in importing my content to my computer. I used a scanner to import my pictures. Thankfully, my digital video (DV) camera supports pass-through, so I was able to connect a VCR to my DV camera, and then import the analog video from the VCR to my computer by using my DV camera and Import Video. Not all DV cameras support pass-through, so this is hopefully a step that not many users will need anymore. (This was a frequent subject of discussion on the newsgroups and not always a pleasant one; as all-digital content becomes more prevalent, the need for this will subside.) Keep in mind that the steps I took below will likely be a tad easier for you.
Most DVD projects are enhanced by the addition of still photos—in the titles or DVD menu, if nowhere else. Still photos are essential to a wedding, but my personal recommendation is to find a photographer who will give you a CD of your photos in high-resolution, preferably already even color corrected. Some professional studios haven’t adapted to the digital age yet, so be sure to ask, as this will be crucial if you are to make your own wedding video. In my case, the pictures were negatives and prints, not digital, so I had the perfect application for the Scanner import tool of Windows Photo Gallery.

The Scanner import tool digitally captures still photos or other printed materials.
To import digital pictures, or pictures from a scanner, with your scanner or digital camera already installed and connected, do the following:
1. Click Start, and then click Windows Photo Gallery.
2. From the File menu, click Import from Camera or Scanner.
3. Choose your digital camera or scanner, click Import, and then follow the steps in the dialog box.
When imported, you may want to crop or rotate the image, fix red-eye, adjust contrast, or make other adjustments. To make these changes, open the picture you want to adjust, and then click Fix on the menu bar. The actions that are available appear on the right.

An imported picture that was cropped and rotated.
After you have imported and edited your photos, close Windows Photo Gallery.
You do the bulk of your work in Windows Movie Maker. You might already be familiar with Windows Movie Maker if you’re interested enough in this article to have read this far. In this version, the user interface (UI) has been upgraded to the Windows Vista look and feel, some new transitions and effects have been added, and you can now publish your movie to a DVD as well. Overall, however, you’ll feel right at home in this version if you’re accustomed to the previous one.
Microsoft didn't attempt to force an entirely new feature set, such as designing a DVD menu and burning DVDs, into Windows Movie Maker. Instead, Microsoft developers included this functionality in a new feature—Windows DVD Maker. Windows DVD Maker takes completed projects from Windows Movie Maker and picks up the DVD authoring task from there. Don’t worry: The integration between the two is seamless and couldn’t be easier.
Note: If you use Windows Media Center, which is also included in Windows Vista Home Premium and Ultimate, you will be happy to learn that this version of Windows Movie Maker lets you import and edit recorded TV programs that are saved as Microsoft Recorded TV Show video files (with a .dvr-ms file name extension).
When finding a videographer for your wedding, I suggest going with one who’s willing to just shoot it and give it to you un-edited in the format you need. Discuss with the videographer ahead of time which camera you have and which format you need. I even suggest a trial run of the videographer shooting a couple of minutes of video and you importing the content into Windows Movie Maker through your camera to ensure that everything works end-to-end. (Occasionally, minor Mini-DV incompatibilities exist among different brands of cameras.) Depending on your camera, you basically want to ask for DV or high-definition video (HDV) recorded on Mini-DV tapes. HDV captures are higher quality, but remember that these captures are down-converted during the final step of creating your DVD. Only the imported files will preserve the full quality.
To start the process of importing video, follow these steps:
1. Connect your DV camera to your computer using either a FireWire (IEEE 1394) or USB 2.0 cable, as appropriate for your camera.
2. Set your camera’s mode to play recorded video, usually labeled VCR or VTR.
3. If the Import Video dialog box doesn’t open automatically when you turn your camera on, from the Tasks pane on the left in Windows Movie Maker, under the Import category, click From digital video camera.
4. The Import Video dialog box will appear as shown in the following image.
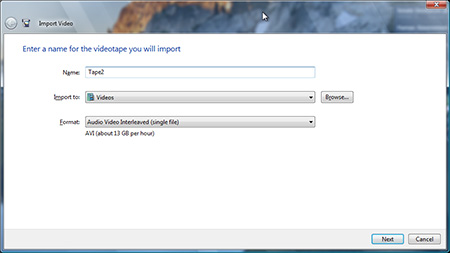
Import a video from tape.
5. Type a name for the imported video file.
6. If desired, choose a different storage location.
7. Set the format to the appropriate setting.
If you have enough disk space for it, select Audio Video Interleaved (single file) to ensure the best possible quality. This setting requires approximately 13 gigabytes (GB) of disk space per hour of video. The WMV option requires approximately 2 GB per hour.
8. Click Next. Choose whether to import the entire videotape automatically or to manually import only portions of the videotape.
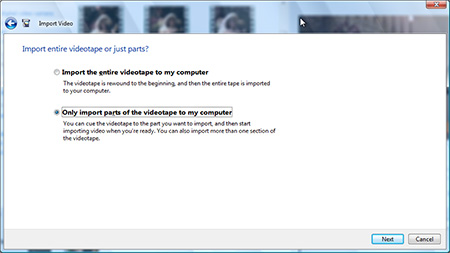
Select whether to automatically import the entire tape or have manual control over the process.
Tip: If all you want to do is quickly and easily convert a videotape to DVD, don’t start Windows Movie Maker before turning on your camera. Instead, turn the camera on outside of Windows Movie Maker. When Import Video starts, on the second page, you can choose a streamlined import process by clicking Import the entire videotape and then burn it to DVD. This option automatically rewinds your camera, starts playback, imports the video, encodes it, and then burns the video to DVD.
If you choose the manual process, the Import Video dialog box contains tape control buttons so that you can navigate through your tape and start and stop the importing process. I chose to import the entire tape, as I would be editing it in Windows Movie Maker for the scenes I wanted.
9. After the video is imported, click Finish.
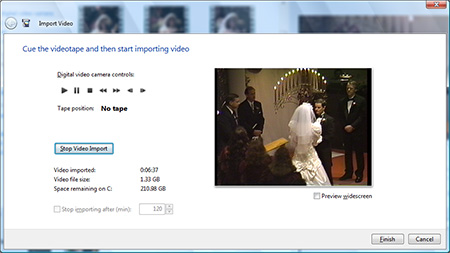
When you import a video from tape, “No tape” always appears when using pass-through mode.
Your videos have now become part of your Windows Movie Maker project. Now, it’s time to import your pictures. Click Import Media above the Tasks pane. Navigate to and select the pictures that you want to import, and then click Import to in to insert your pictures into your Windows Movie Maker project.
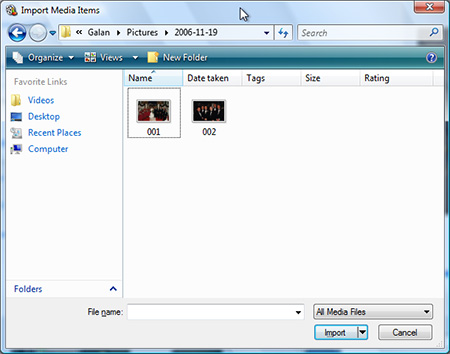
I selected pictures that I prepared in Windows Photo Gallery.
When all your content has been imported, you can start the editing process. I won’t go into that here, as there are plenty of resources for using Windows Movie Maker (many of which are referenced in this column’s sidebar), but here’s a completed project.
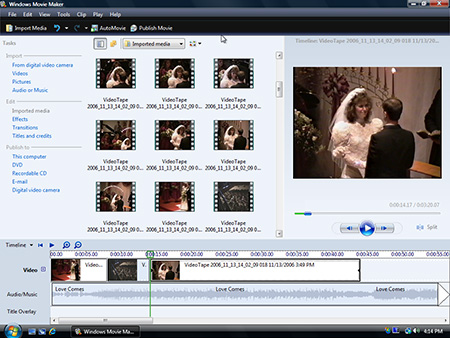
A finished movie that is ready for burning to DVD.
Experiment with the transitions and effects, but don’t overdo it. Too many cheesy effects, and your video looks like it was produced in Las Vegas in 20 minutes while you waited. Direct cuts or short fades work best. The Heart transition is perfect for wedding videos (when used sparingly and at the ideal moment). You can also take advantage of the Audio/Music track on the timeline for adding your favorite music in the background or for narration, such as perhaps each parent re-telling a short funny story about their son or daughter as a child.
When your project is ready to burn to DVD, save it with the name you’d like it to have (this name becomes the default title for your DVD). To do so, from the File menu, click Save Project As. Then, from the Tasks pane to the left, click DVD under the Publish to category. A dialog box alerts you that your Windows Movie Maker project will be closed and sent to Windows DVD Maker. You’ve already saved your project, so click OK.
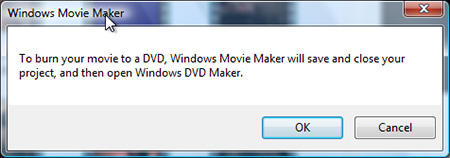
Your completed Windows Movie Maker project will be loaded into Windows DVD Maker for creating a DVD.
Finally, the moment you’ve all been waiting for: built-in support for burning DVDs! Windows DVD Maker will open with your Windows Movie Maker project already added.

Your completed Windows Movie Maker project is added into Windows DVD Maker.
Choose a different DVD burner if you have more than one (and the correct burner is not already selected). If this is the first time you’ve run Windows DVD Maker, click Options to open the DVD Options dialog box.
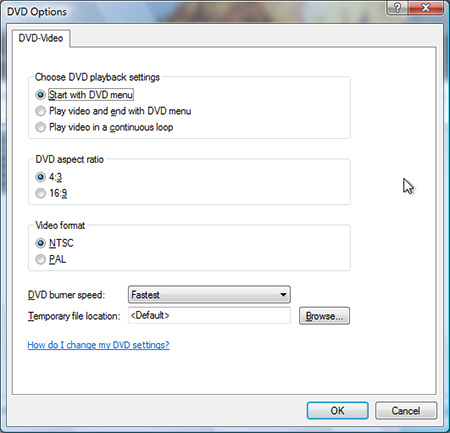
Customize your DVD burning options.
If the burning speed or the temporary file location is not to your liking, change them here. You can also make other adjustments, such as aspect ratio, video format, or playback settings. Make any changes you want, and then click OK. Now, click Next to go to go to the next page in Windows DVD Maker.
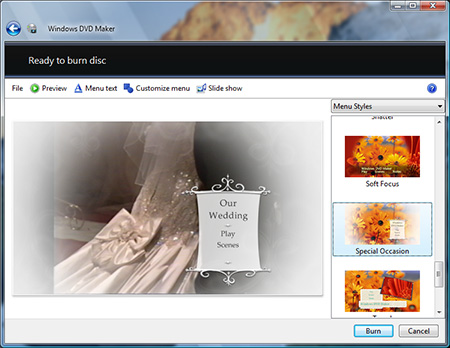
Windows DVD Maker lets you change menu styles and titles.
From this window, you can preview your DVD or edit the menu style or text. Start by choosing your preferred menu style from the list at the right. Click Preview to se to see what it will look like. Use the controls to play the menu or the video.

Preview allows you to watch the video or the DVD menu before burning a disc.
You can change the font or button names for the DVD menu by clicking Menu text.
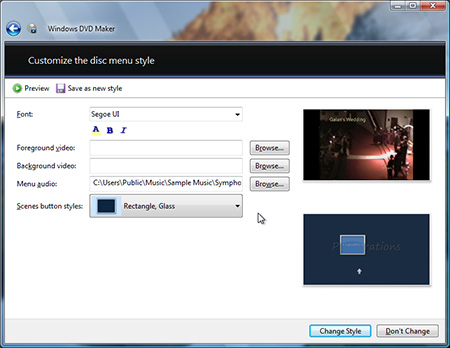
You can change the menu font or button titles.
You can make further changes to the menu, such as adding custom background music or video, by clicking Customize menu. When your menu looks the way you want, you’re ready for the big moment. Make sure that you have a recordable DVD inserted in your DVD burner, and then click Burn.
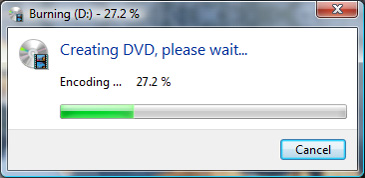
The encoding and burning process is now underway.
The file will be converted to the MPEG-2 format that DVD players require, and then the DVD burning process will begin.
Your disc is ready!
The answer to my question was, yes, it is indeed possible to create important family DVDs using Windows Vista on a current-model computer. I was delighted with the result, and I can’t wait to show it to my wife and family. I only wish all this had existed 11 years ago!
Producing your own wedding video may, in some ways, give you an even better product than having a professional studio do it. Perhaps not technically, but at least in the sense that having creative control over the editorial process allows you to select scenes and camera angles that are most meaningful to you. Catching a glimpse of that special person in your life that helped you so much, for example, where a professional editor would not know that those three seconds of video held meaning to you far beyond what the editor could imagine. Similarly, not many people have family vacation videos professionally produced, but the same could be said for these videos as well. We may not possess the knowledge and tricks of the pros, but we know what’s special to us.
This entire process was so much fun and produced such a nice product; it’s exciting to think of the new era this opens up in family entertainment, preservation of family memories, school projects, and even amateur movies and shorts. The wait is over, and the dawn of a new era of custom DVDs being commonplace has just begun.
 |
Galan Bridgman is a developer, architect, and enthusiast for digital media technologies. He co-developed QuickTime for Windows for Apple Computer, and also worked on the Akimbo Player, and the Microsoft IPTV client. He is the CTO of a stealth-mode startup specializing in next-generation interactive advertising technologies. After hours he enjoys showing others how to make the most of Microsoft's latest Windows Media applications. Check Galan's Web site for more information about him. |